Showing posts with label christmas elf. Show all posts

Wednesday, 11 March 2020

Christmas Trees & Stencils

Hello Crafty Friends!

Today I'm sharing a couple of projects made for March's Christmas In The Air feature over at STAMPlorations. In this special feature Nancy and I are sharing a couple of Christmas projects each on the 2nd Wednesday in March and May.


This month I thought I'd go with Christmas Trees and stencilled backgrounds allowing the Sketchy Yule Trees to take center stage.

My first card features one of them with a starry background ...


I coloured the tree with metallic pencils, stencilled the stars and grounded my tree with my stamped sentiment. It was stamped in full to one side of the tree and just a bit of it to the other side.

You can easily do this using a stamping tool, simply by sliding your card across as shown ...


As you can see, these photos of the easy way were taken after my card was finished which means I did it the hard way. ;)

If you don't have a stamping tool, it's easy to do with a craft mat and ruler too. Simply align your card with the grid of your mat and make a faint pencil mark as your stamping guide.


Here is a close up of my first card ...


Next up is a Banksy inspired card ...


Initially I had a grungy look in mind, but going with the flow an almost CAS look suited my messy watercoloured tree better.

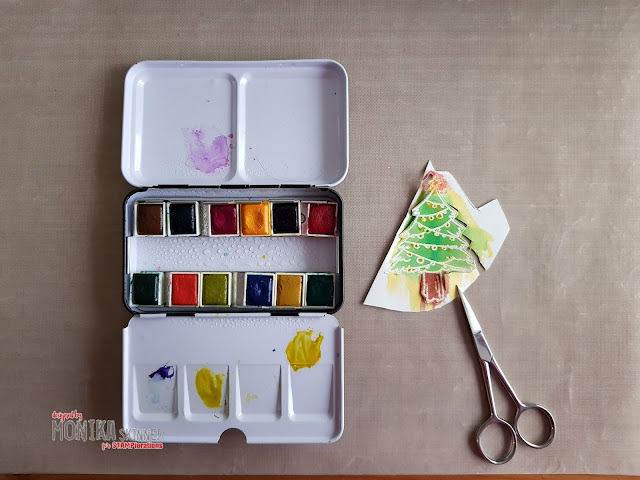
Given that white embossing looks best on coloured background, I decided to colour outside the lines for maximum impact before fuzzy cutting my tree. You can go rather messy with the colouring, it will be much neater once the tree has been cut out.


I popped it up on foam pads and added it to my stencilled background, stamped my sentiment and finished off with small gems.

Brick Wall, one of Helen's new stencils due to be released next week, was stencilled using Smoked Paprika Prism ink.

Here is one last look ...


Pop over to the STAMPlorations Blog to check out the lovely projects my teamie Nancy made. The Christmas In The Air feature also doubles up as a mini blog hop. Shery will randomly draw one winner of a $15 gift code from all the comments left on the Christmas In The Air posts on the STAMPlorations Blog, on Nancy's log and on my blog.


Have fun hopping along.
hugs
Monika xxx


here is what I used from the STAMPlorations Shop

Sketchy Yule TreesChristmas ElfOh, My Stars! Mini Stencil
preview-SketchyYuleTrees  preview-web-stencil-oh-my-stars-mini

Joy, Brick Wall Stencil (designed by Helen G Designs) due to be released next week
preview-Joy

Wednesday, 8 January 2020

One Can Never Start Too Early

Hello Crafty Friends!

Today I'm sharing a couple of projects made for January's Christmas In The Air feature over at STAMPlorations. In this special feature Nancy and I are sharing a couple of Christmas projects each on the 2nd Wednesday in January, March and May. You can never start too early making Christmas cards. That way you won't be caught out, at least that's what I've decided to do this year.


I thought I'd start with sharing a couple of one-layer cards, perfect for sending abroad and overseas.

First up is a card with a stencilled holly border.


The inspiration for this card came from my chosen sentiment 'Have a jolly holly Christmas'. It was perfect for a stencilled holly background. My latest toy for blending ink, little eyeshadow applicator brushes, would come in handy too.

I first masked off the strip, positioned the Holly Background Mini Stencil and taped it down.


Next I chose 2 shades of green, 2 shades of red, 1 shade of yellow and simply used the brushes to blend my inks through my stencil ...


... and around the holly before removing the masking tape. I ended up with a nice decorative strip. The stamped sentiment finished my card off perfectly.

TIP!: For a different look, try moving the stencilled strip to the top of the card front and/or change the position of the sentiment.


Next up is my second card featuring a little pencil coloured Elf.


This little elf was so delicate that I felt a CAS card would be the best way to help it take center stage.

To colour the elf I used metallic pencils. Their subtle shimmer adds some extra interest interest as it catches the light. Sadly the shimmer doesn't show up in photos, but looks pretty on the card. A few stencilled stars and stamped sentiment finished my card off.


I decided to stamp my sentiment towards the top of my card front for a more balanced look. I felt it would look too heavy right next to the elf.


Pop over to the STAMPlorations Blog to check out the lovely projects my teamie Nancy made. The Christmas In The Air feature also doubles up as a mini blog hop. Shery will randomly draw one winner of a $15 gift code from all the comments left on the Christmas In The Air posts on the STAMPlorations Blog, on Nancy's log and on my blog.


Have fun hopping along.
hugs
Monika xxx


here is what I used from the STAMPlorations Shop

Holly Background Mini Stencil, Christmas Elf, Oh, My Stars! Mini Stencil
preview-web-stencil-holly-background-mini  preview-web-stencil-oh-my-stars-mini

Sunday, 15 December 2019

Bunny Wishes

Hello Crafty Friends!

This is a little reminder that there is still time to play at this month's challenges over at STAMPlorations.

Here is my card for a bit of more Theme & Photo Prompt inspiration ...


The theme for the current challenge is Stamps & Holidays and the photo prompt can be seen below. Your project can either be inspired by the theme, photo prompt or both. The full challenge rules can be found here on the STAMPlorations Blog.


As you can see my inspiration came from both the theme and photo for my coffee themed Christmas make. The little black coffee sipping bunny was given a red Santa hat for the festive spirit and the sentiment sticker was attached to vellum and adhered to my stamped and fuzzy cut frame.

I finished the bunny off with googly eyes and the inside of my card has the festive message.


As for the prizes:
Two winners, one of a $15 gift certificate and one of a $10 gift certificate, will be picked by one member of our DT.
Plus 3 randomly drawn winners will each receive a $5 gift certificate.

In order to be considered for a prize, make sure you've followed the rules here.


Pop over to the STAMPlorations Blog to check out how my teamies interpreted the challenge theme and prompt and of course to join in the fun too.

Need more inspiration? Check out the Challenge Reminder Post here on the STAMPlorations Blog.

That's it from me for now. Have a lovely day!
hugs
Monika xxx


here is what I used from the STAMPlorations Shop:

Tuesday, 10 December 2019

Quick Tags

Hello Crafty Friends!

It's Tuesday and this means it's Inspiration Time over at STAMPlorations. Remember the tags from my last Spotlight Project here? Well I finished them for today's post.

Here they are ...


The tags are on a ready printable sheet in PDF format and fit with the Stitched Tags Nesting Dies.

TIP!: Our A4 format in the UK is slightly different from the page size of the PDF. I simply make sure that the Fit To Size option is un-ticked before printing. That way the original formatting of the PDF file is retained and the images still fit with the appropriate size nesting die.


I simply added some colourfully embossed sentiments and ribbon.


The cups from the Holiday Lattes set make lovely tags too, they need re-sizing first. For those who've never used digi stamps before, I got a little screenshot tutorial at the end of my post using Google Docs. No need to have special photo editing software.


Again, I am keeping it short and sweet today. Pop over to the STAMPlorations Blog to check out the fabulous projects my teamies made.

That's it from me for now. Have a lovely day!
hugs
Monika xxx


Here is what I used form the ...

STAMPlorations Shop:
Christmas ElfChristmas Reindeer, Christmas Cookies & CheerStitched Tags Nesting Dies
preview-ChristmasElf preview-TBK-ChristmasReindeer preview-ChristmasCookiesCheer 00preview-stamplorations-stitchedtags

STAMPlorations Digital Store:
Holiday Lattes Digi Stamps


Here is my little step-by-step:

I like making 'master pages' with a few images on using the rulers at the top and the side to judge the image size, see the pink arrows. If I want multiple of the same image, I simply copy and paste the adjusted image until I got as many as I like to have.

I am using Google Docs on my Chromebook which is very similar to Word on Windows.


First I open a new document and set the margins to 1 cm. I then use the insert image option to get my digis on the page.


To start with they are rather large, and I use one of the corner points to resize them. Simply point your mouse on one of the points and it will turn into a double pointed diagonal arrow. Click, hold and move towards the middle ...


... until you reached the desired size. You are now ready to copy and paste your image multiple times. This way you always have the right size image to cut masks from, if needed. Enjoy!


Giving you a little heads up on STAMPlorations latest promotion ...
Take advantage of their last sale of the year. Get 25% off nearly all products in the store*.