Thursday, 9 April 2015

Back To Basics

... or so I thought ;-D
Hello All!
It's time for me to post another Spotlight Feature over at STAMPlorations and as usual I share my projects here on my blog too.
Well, the new Stamp Club set called Mixed Media Grunge arrived in the post the other day. Luckily I was able to have a little playtime recording a video as I went along. My initial idea was to use some of my chalks with the swirly flourish stamp from the set. I cut my panels to size, stamped my image with watermark pigment ink, picked up some chalk and ... arrrgh ... it didn't work the way I wanted it to. All I ended up with was a coloured panel or two or three ... that's when plan B kicked in. I had wondered for some time how this technique might work with some old eye shadows I have ... out came the Clarins luxury ones, at least for me, I got some years ago. I couldn't bring myself to throw them out despite my eyes struggling with makeup. Well, what can I say, I found another use for them. See for yourself ...
Yes, in my first card I highlighted the watermark stamped images with eye shadow which I found a lot easier to use than chalks. For my second card I used the panels which I had coloured using my shimmery chalks. The image was then stamped with black VersaColor ink.
Full descriptions on how I made the cards can be found on the STAMPlorations Blog here where you can also leave a comment to win a prize.
That's it from me for today. I shall be back again tomorrow with another couple of projects for you, until then ... have a lovely day!
hugs
Monika xxx

the stamp sets I used:
Mixed Media Grunge - VIGNETTE Tree Silhouettes - Mixed Media Grunge is the Stamp Club set for April/May 2015

 stmp1032.jpeg 

Sunday, 5 April 2015

Easter Tweets

Hi Everybody,
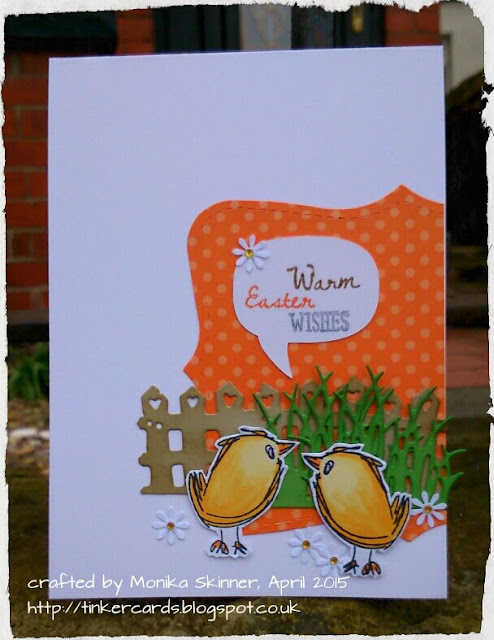
Happy Easter and more birdie tweets ...


I had hoped to get some posting in on Good Friday but my hubby had other ideas and whisked me off to our local Garden Center for lunch and a somewhat rainy walk afterwards. That was after much debating if we should go to Holywell or not. For once I am glad that I insisted we'd go for lunch and do Hoylwell on the Saturday. The weather yesterday was just fantastic, and we were able to have a picnic outside in the sunshine and discover places we never knew existed. Holywell quite magically turned from being a cold and forbidding place, which it was when we last visited one Winter's day some 12 years or so ago, into a warm and welcoming place with lots of surprises and stunning Wirral views across the Dee estuary. Once home, we had to round the day off with a lovely BBQ, our first for this year.
What can I say ... not much time for crafting, and the Gelli plate hasn't seen the light of day yet!!!
Anyway, birdie wanted a quick tweet this morning. How could I resist! Impossible, it was. A bit of die cutting, punching, blending, colouring, fuzzy cutting and gluing and the card was made.

I am entering the little chicks at the following challenges:
Sisters of Craft - Anything Goes
Scribble and Scrap - Anything Goes
Card Mania - Flowers
Crafts Galore Encore - Make a Card
613 Avenue Create - Anything Goes
Stempelsonne - Anything Goes, used birds as main image
Allsorts - Easter

Sending you warm Spring Time Wishes for a lovely Easter weekend.
hugs
Monika xxx

here is what I used:
The Bee's Knees Smallbirds stamps - STAMPlorations April Release stamps currently on offer until 10th April
Sizzix Top Note die, patterned paper - Stampin'Up!
Grass die - Clearly Besotted
Fence die - Magnolia DooHickeys
Speech Bubble - Sizzix Eclips shape
Small Daisy punch - Xcut by docrafts
Gold and Buttercup Promarkers - my local craft shop at Burleydam Garden Center
OR1 Spectrum Noir Marker - Crafter's Companion

Thursday, 2 April 2015

Birdie Tweets

Hi Everybody,
How has your week been ... so far mine was busier than expected. As I'm writing this I got one more client to see, and then I shall be off for Easter ...
You might have spotted in my post yesterday that my new STAMPlorations stamps had arrived and that I was going to have some playtime, well here is one of my makes:
As soon as I saw the The Bee's Knees Small Birds set, I fell in love with this little birdie. He just looks as if he wants to talk.
I simply blended some yellow, orange and pink on a piece of cream card and added some blues around the edges, sprayed it with a little water and my background was ready. I stamped the bird on a piece of scrap cream card and added some yellow and orange ink using my dried baby wipe. It only needed a little dabbing, it must have been the quickest colouring I've ever done! I then stamped the sentiment from the Noteworthy set on a die cut speech bubble and my border from the Mixed Media Grunge set directly on the front of my card. I then attached my panel, sentiment and fuzzy cut birdie before stamping the inside as shown below ...
I had lots of fun working with this cute little dino. Here is a sneak preview of all the sets from the new release:
You can find all the information about the new stamp set, which are available at a discounted rate until 10th April, on the Inspiration Post here.
The Mixed Media Grunge set below is the current STAMP Club set, and I'll surely have lots of fun with it too .... need to get my Gelli Plate out asap!!!
I'm hoping to be back again tomorrow with more inspiration. Just in cars I'll get carried away gelli plate-ing ... Have a lovely Easter ...
hugs
Monika xxx

Wednesday, 1 April 2015

CASEplorations April


Hi Everybody,
It's CASEplorations Time again. This is where we, the STAMPlorations Girls, pick one card each month to CASE. CASE originally means copy and share everything, but in our playground we understand it as take inspiration from ...

This month we are taking inspiration from a card Kimberly Wiener made for her post here, when she was our Guest Designer for the Stamps & Glitter challenge last July.


I love the bright orange combined with the blue. The splatter pattern also stood out to me as something that I liked.
I actually made my card last Friday in between seeing clients which meant I didn't want my fingers getting inky. This is why instead of splatters I used dots and circles to get the movement for my card. I stamped these using the ring from The Bee's Knees Newlyweds Extras set, the ring was used for the circles and simply turned over for stamping the bubble like dots.
I then took a die cut butterfly and added some pattern to it by embossing the Distressed Damask Background in light blue and highlighting it with a darker blue using the resist technique.
To add some more contrast I decided to layer my butterfly on a piece of orange card with a blue banner and white on black greeting from the Joyful stamp set.

To finish my card off I simply added some sequins ... and here it is:


As always there is a chance for you to play along at the CASEploration Playground, more details can be found here.
Before I go just a quick reminder that the new APRIL Release Stamps are available at a 10% discount until 10th April. If you are a member of our Stamp Club, you will get your 15% discount on top of that too.

Smiles all around. Mine arrived in the post today .... off playing ...

Have a lovely day!
hugs
Monika xxx

stamps I used:
stmp1002-a.jpeg  stmp1092.jpeg 

April Release stamps


Tuesday, 31 March 2015

Lovely Moments

Hi Everybody,

back with a second post today. Looks as if there is no stopping me ... LOL
Well I finally got my banner finished. I started it last Saturday at a KaierCraft Demo in my local Craft Shop at Burleydam Garden Center. The lovely Elisabeth Robinson was demoing ... and I was able to meet up with Julie from Crafted by Jules. We had a good natter and a fab lunch too!


The photos are from our last ever holiday in our caravan, not that we knew it at the time ... a few weeks later we got an offer we couldn't refuse and sold it.

Enjoy and have a lovely day!
hugs
Monika xxx

Label dies - Inspired by Stamping
bird dies, butterfly stamp, lace border die, Lovely Moments sentiment and paper - KaiserCraft
rose die - Wild Rose Studio
doily die cuts - were given to us at demo
Enjoy The Journey sentiment - STAMPlorations

Happy Thoughts

Hi Everybody,
Today I got three projects I want to share with you, all of which form part of the Inspiration Round Up Post over at the STAMPlorations Blog. As you've probably noticed for one reason or another I didn't have much time this month to craft. Yesterday was the first day I could really sit down and indulge myself ...
With Spring having officially started, I thought the SKETCHED: Tulips would be the perfect stamp to work with. As always I had a vague idea of what I wanted to do which was that I wanted my tulips to be yellow with a hint of orange ... off I went to colour some using Promarkers and watercolour pencils.
Here is my first card using the fuzzy cut Promarker coloured image ...


Initially I thought I'd add some splashes or dotty patterned paper to my background, but after trying out various options, I decided that I wanted to keep this card crisp and clean ... and the dotty paper morphed into a dotty embossed piece of white card and a strip of dotty ribbon. Once layered, I simply added a framed sentiment from the Blossom Overture stamp set, our current STAMP CLUB set, a punched butterfly and gems to finish.
My watercoloured Tulip image is next and I went all out grungy for a floral birthday card ...


The style of this one and my third card was inspired by the sprayed backgrounds I made a while ago when trying out my Artiste Spirtzing Inks (docrafts) on lining paper. Lining paper is great as it drys flat after being wet. With it being cream which mutes the colours somewhat, it is also ideal to create a grunge or vintage look for your card. This card simply developed as I went along. First I stamped the Chevrons and Arrows in apricot pigment ink (ColorBox), next I spritzed some brown and peach splashes, then I added the stitching (PATCHWORK FRENZY: Graphic Squares) to two of the corners and stamped the rings and circles using the ring stamp and its reverse from the Newlyweds Extras set (The Bees Knees by STAMPlorations). It is great for almost bubble like stamping. I layered it all up, added my white embossed sentiment (VIGNETTE: Chevron & Arrows) and finished off by adding a few green metal embellies.
Next up is another Grunge Card ...


I started off by stenciling the word HUGS from the ARTplorations Stencils: Hello & Company in red over my sprayed background. To add dimension I first drew the outline of the word in a darker red and added some partial white outline using my chalk marker. I then added some more stenciling using the ARTplorations Stencils: Hearts All Over around the outside allowing it to fade towards the center. I then added some splashes and rings from the Holiday Artsy set before rounding three corners, layering on my light cream base card, attaching my sentiment banner (VIGNETTE: Chevron & Arrows) and finishing off with a tiny punched heart. I did contemplate adding some bling, but decided against it given that the spritzing ink is already pearlescent and that it would make a good masculine birthday card as it stands.

Hope you enjoyed my little offering today.
Back soon with more inspiration ...
Have a lovely day!

Hugs
Monika xxx


What I used from STAMPlorations:
 stmp1024.jpeg stmp1031.jpeg stmp1092.jpeg stmp1041.jpeg preview-web-stencil-007-hearts.jpeg preview-web-stencil-010-bigwords.jpeg

from Stampin'Up!
early espresso, bravo burgundy, riding hood red, pumpkin pie, rich razzleberry inks; chalk marker; early espresso and rich razzleberry card; owl builder (tiny heart) and small butterfly punches

ribbon - Fantastic Ribbons

gems and other card from stash

Tuesday, 10 March 2015

ARTplorations Stencils Blog Hop Day 3


Hi All! Welcome to Day 3 of the ARTplorations Stencil Blog Hop where we, the STAMPlorations Girls, put stencils through their paces.
Today is less bright and daring, and I worked with the ARTplorations Stencils Oh My Stars! and Bubbles.


For my first card I dry embossed the Oh My Stars! stencil using my Big Shot and a rubber embossing sheet, which you simply place on your stencil before adding the required plates (check your machine instructions as these vary depending on make) and putting it through your machine.I left the stencil in place and sponged More Mustard ink to highlight the stars even further. I then removed the stencil and did some more sponging before adding a die-cut frame (Tattered Lace), swirl, sunflower and sentiment (both from the Bloom Sketches set) and finishing off by adding a butterfly (Trendy Butterflies) and pearl.


For my next card I created a background using inks and crafting mat. First I swiped some Tempting Turquoise ink over my crafting mat, spritzed it with water and took a print by placing a piece of card on the inked & spritzed area and smoothing over it using my hands. After it had dried I repeated the process using Island Indigo ink. Depending on how wet you make the ink on the mat, you end up with a more or less splattered look. Mine wasn't very wet, this allowed for the swipe marks to add a different type of texture and interest. Once dry I rounded three corners, attached my Bubbles stencil and sponged some more Island Indigo all over keeping it darker towards the edges. Next I white embossed my sentiment from the Boxed Blooms set and added a die-cut border (Tattered Lace) before finishing off by adding some tiny stars and butterfly (Trendy Butterflies) with pearl.

SIX winners, that's two per day randomly drawn from all the comments left on our blogs, will receive their choice of ARTploration Stencil.

THREE winners, randomly drawn from comments left on the STAMPlorations Blog Blog Hop Posts, will receive a $15 gift certificate from the STAMPlorations Store.

plus surprise prizes

Commenting finishes 13th March and the winners will be announced 15th March. Good Luck!

Make sure you leave a comment when visiting our blogs, you can find all the links here.

Have fun hopping!
hugs
Monika xxx

Here is what I used:
preview-web-stencil-009-stars.jpeg preview-web-stencil-008-bubbles.jpeg stmp1061.jpeg stmp1053.jpeg stmp1082.jpeg

Tattered Lace dies by Stephanie Weightman
all inks mentioned from Stampin'Up!