Showing posts with label Crafter's Companion. Show all posts

Friday, 18 November 2022

Christmas Santa

Hi Crafty Friends!

Today's card uses some golden oldies which have been part of my stash for at least 7 years. Have a look ...


The background was part embossed with a Sizzix Texturz plate and score board lines. The Santa was stamped, watercoloured, fuzzy cut and popped up against some snowflakes.
Stamps by Crafter's Companion, small snowflakes from a Dovecraft punch, the middle snowflake from a Creative Memories punch and the large snowflake is a Xcut die.


Wishing you all a lovely day!

hugs
Monika 💕

Monday, 14 November 2022

A Robin Christmas

Hi Crafty Friends!

It's time to share another cutie ... a little robin from a See D's set I recently bought from a de-stash group ...


The little robin was watercoloured and paired with a sentiment by Crafter's Companion. I felt it was perfect for a very CAS slimline card.


Wishing you a lovely day!

hugs
Monika 💕

Sunday, 23 October 2022

Oldies Are Goldies 2

Hi Crafty Friends!

Today's card uses the same critter I used on yesterday's.


Today's sentiment is from a retired set by STAMPlorations and the square die is by Die-namics.


Wishing you all a lovely day!

hugs
Monika 💕

Saturday, 22 October 2022

Oldies Are Goldies 1

Hi Crafty Friends!

Another little Christmas card for you today using a few bits I've had for a while ... have a look ...


Sometimes it's really good to look through stamps and dies one had for quite a while, especially when one's mojo has taken leave.
I found this little critter among some older stamps by Crafter's Companion. It was combined with a snowflake by Xcut and two more dies from my stash.


Wishing you all a lovely day!

hugs
Monika 💕

Thursday, 20 October 2022

Merry & Bright

Hi Crafty Friends!

Back after a lengthy summer break where life just took over.

Today's card is a little Christmas card using a little dog and cat from a See-D's set I recently purchased from Nicola Prior in the UK Stamper's Forum De-Stash Group ... have a look ...


They were popped up against a background of stars and trees, stamps by Crafty Roo Designs, complemented by a sentiment from Crafter's Companion and finished off with a tough of glitter on the hats.


Wishing you all a lovely day!

hugs
Monika 💕

Friday, 1 July 2022

Boaty Birthday

Hi Crafty Friends!

Another little CAS card for you today ...


This time I used the boat from the Spielwaren set by Charlie Und Paulchen and combined it with an embossed frame and a piece of pretty paper.


Wishing you all a lovely day!
hugs
Monika 💕

here is what I used:
- Weihnachtsladen Spielwaren die set for the boat by Charlie Und Paulchen
- embossing folder by Crafter's Companion, came with one of their magazine kits a while ago
- Frame from a Sizzix Originals die which I got years ago
- scalloped stitched frames nesting dies and Happy Watercolour design paper pad from The Works
- sentiment from a set by Clearly Besotted

Wednesday, 4 July 2018

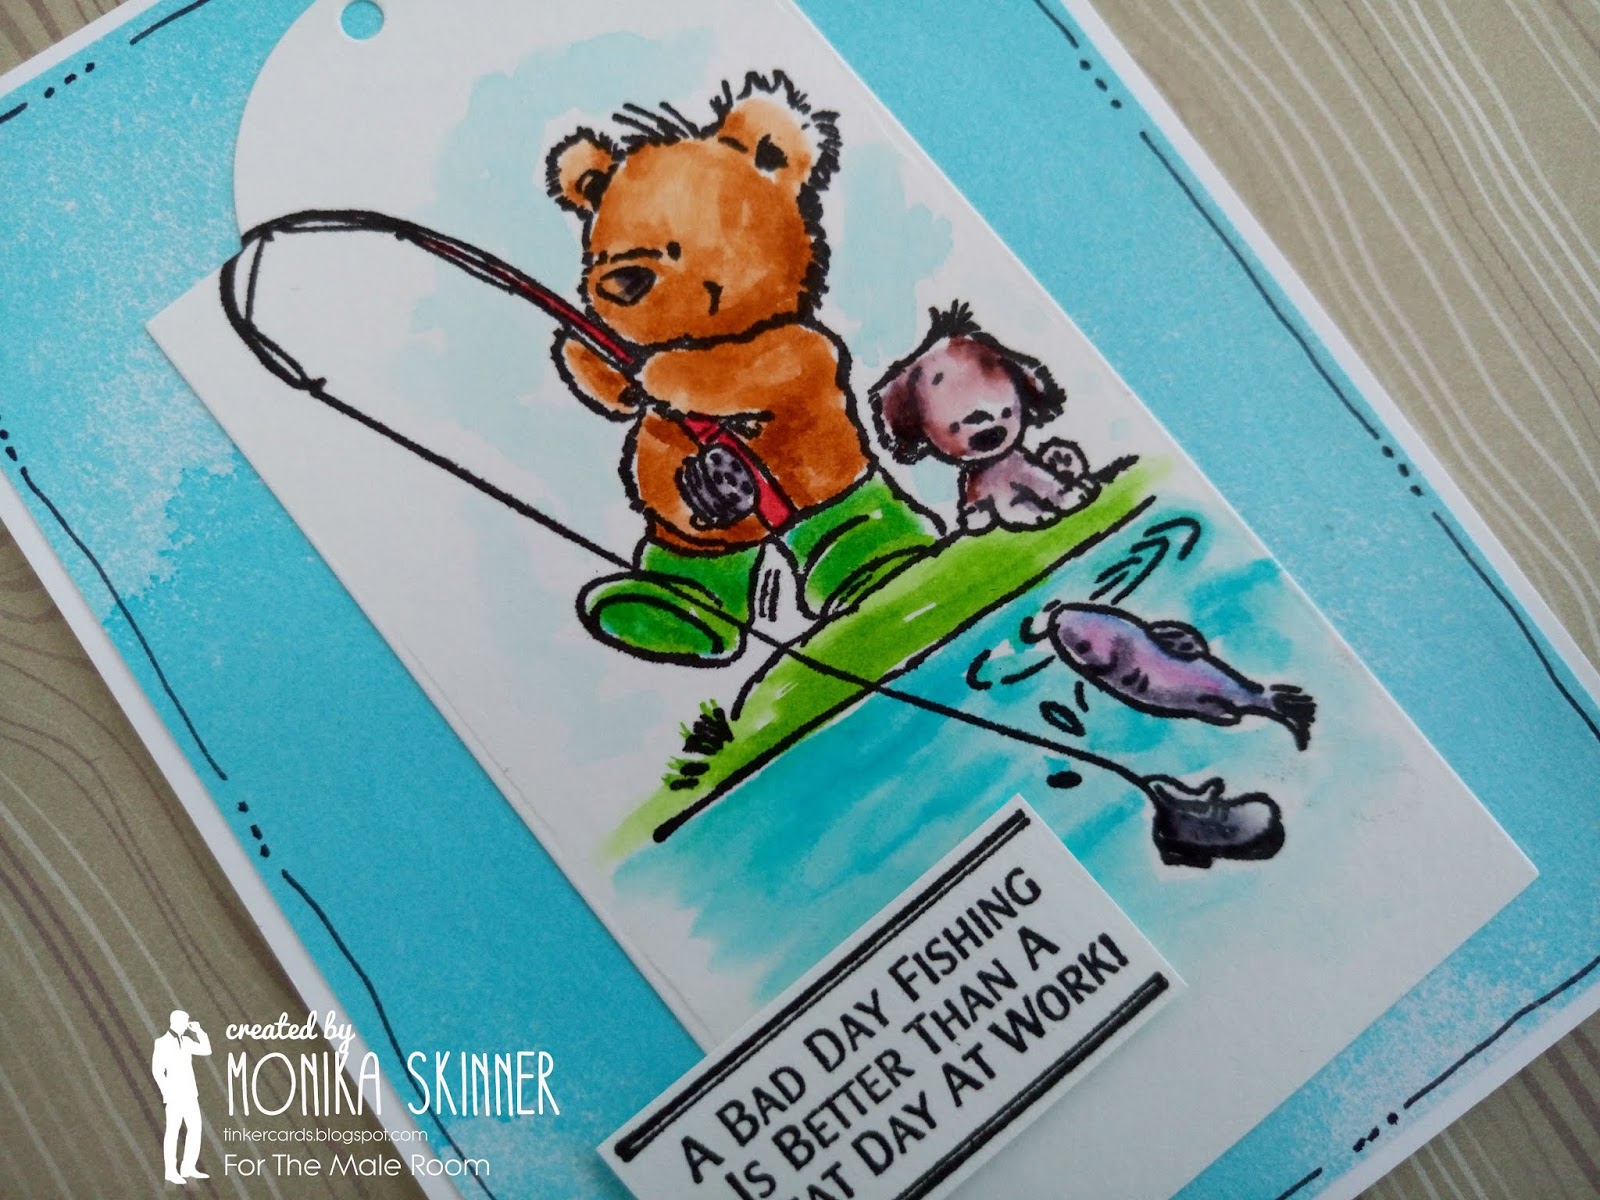
A Bad Day Fishing

Hello Crafty Friends!

It is Wednesday and time for a new challenger over at The Male Room challenge blog where the bi-weekly challenge is all about making projects for the men in our lives.

My DT project for the new challenge is watercoloured cutie of a card ...

Each challenge, of course, has a different theme. For challenge #89 we are looking for projects which fish or anything fishing related. Lots of scope there!


Well, I had to dig out this cute fishing bear. I just love the sentiment, and I am sure anyone will be able to relate to it especially with the hot weather we are having at the moment.
The background is made with spritzed watercolour and the image is coloured using marker pens and waterbrush.


Fancy creating your 'Fish/Fishing' inspired make, pop over to The Male Room for more inspiration and to link up your masculine makes.

That's it from me for today
Have a lovely day!
hugs
Monika xxx

here is what I used:
Gone Fishing stamp - Crafter's Companion
Cyan Liquarel liquid watercolour - Artfix
black Versafine ink, Mixed Media card, white card, fine liner pen- stash

Tags #1 Nesting Dies - STAMPlorations, you can use my personal discount code STAMPGIRLMONIKA in their shop at checkout to get a 20% discount, best of all it works on Sale items too

Monday, 21 September 2015

Die Cut Beauties

Hi Everyone,

Hope you all had a lovely weekend. Mine was taken up by going to the newly opened Range, having a boat trip on a canal and trying to work ahead as I am going to be a little busy next month.

As you've probably already noticed, I tend to mainly stamp my cards. Nevertheless I do own a few dies too, and they decided they wanted some playtime this weekend.

First up is a card I made using the cover gift from Quick Cards Made Easy ...


... and next is one I made using my Xcut snowflake die ...


As you can see I used my favourite spritzing inks, combined them with the die cuts. a little stamping and doodling. These cards are super easy to make and won't need an explanation.

I shall be back soon. Have a lovely day!

hugs
Monika xxx


here is what I used:

1st card: heart die - Quick Cards Made Easy; label die - Spellbinders; gold Artiste Spritzing Ink - docrafts; twine - The Ribbon Girl; red gel pen and peel-off from stash

2nd card: Xcut snowflake die - docrafts; sentiment stamp - Crafter's Companion; Mustard and Pink Spritzing Inks - Heidi Swapp; black Versafine ink and gems from stash


Monday, 15 July 2013

Thank You Stars

Hello and Welcome

to my new 'Step by Step Tutorials' blog.
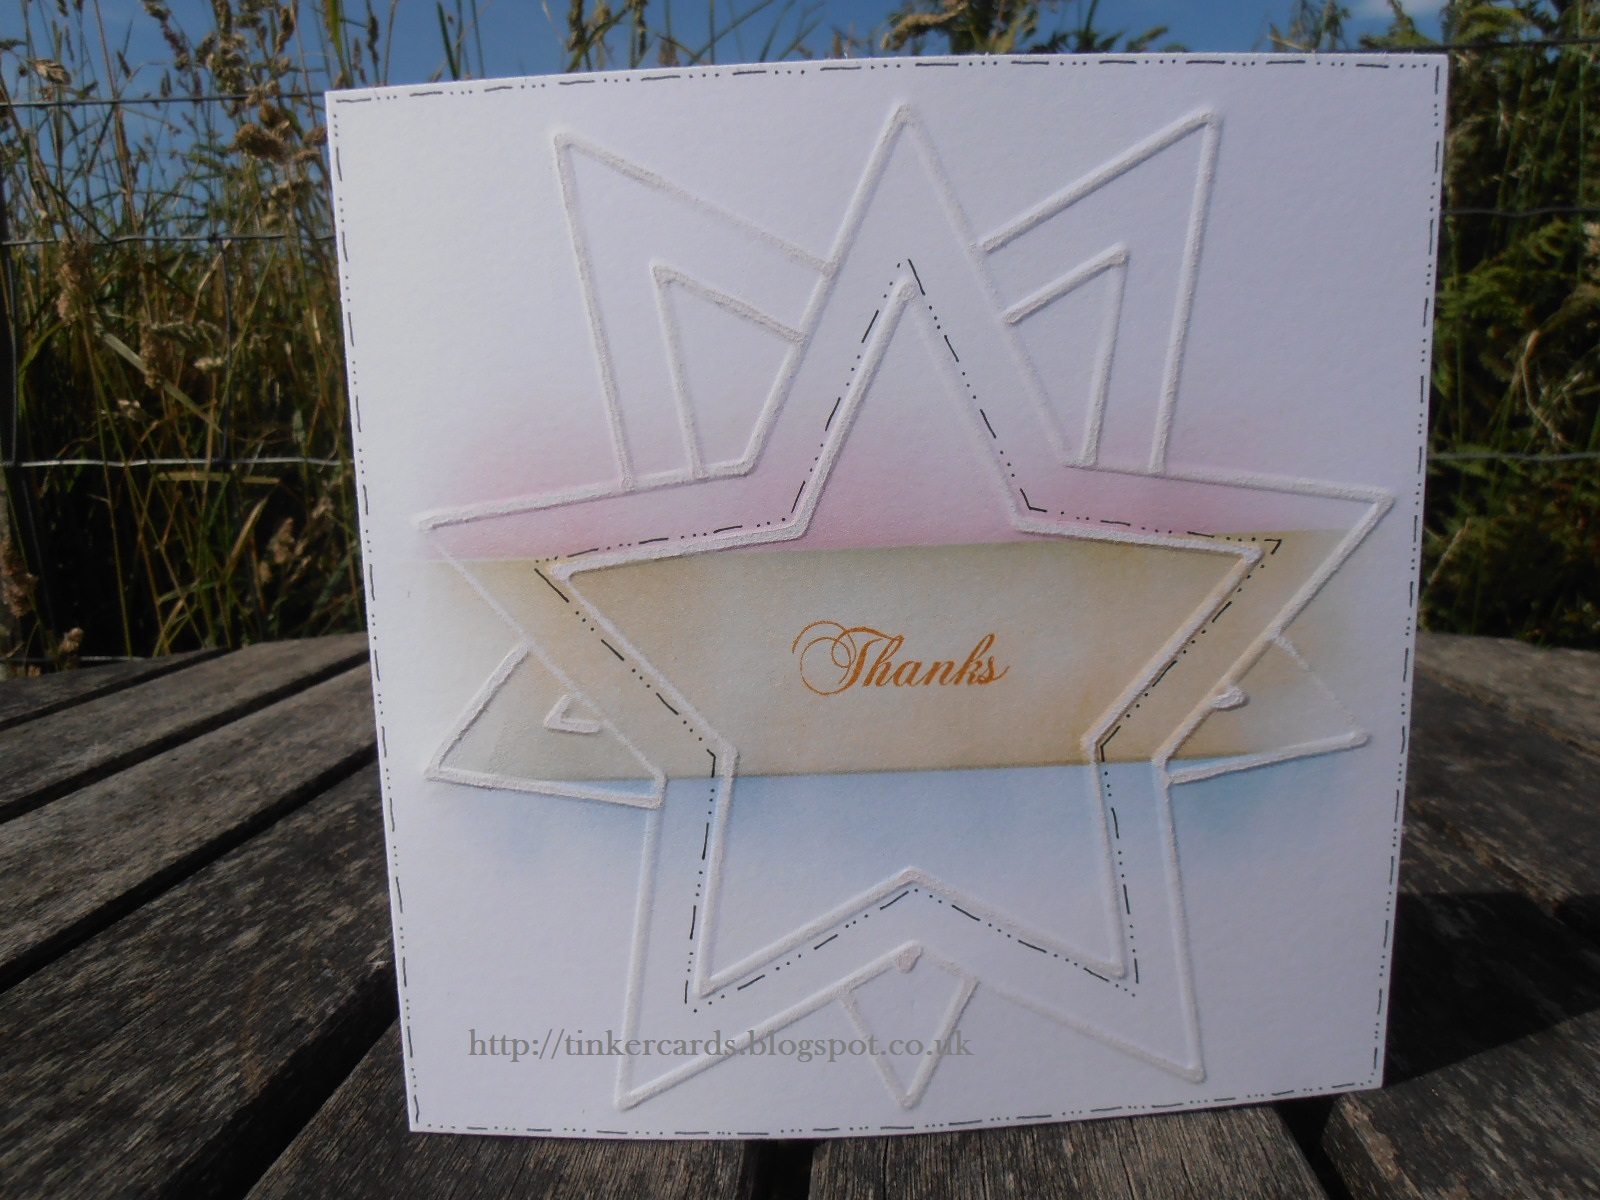
The first project, I would like to share with you, is one I made when on holiday at the caravan recently. It was one for the Out of a Hat Creations challenge blog, where the theme was 'Stars and Stripes'.


I managed to grab a bag full of bits before leaving. Naturally I didn't even use half of it, especially as the weather was so nice that I had little time for crafting...LOL
Stars and Stripes normally means something with an American Theme. There was nothing in my bag to do that, so I had to think a bit out of the box. There were stars I could emboss using my Ultimate Pro, and I could do stripes by blending inks. All I needed was something to mask off a straight line or two.
From my bits, this is what I used:


Ultimate Pro by Crafter's Companion and embossing tool
Sentiment Stamps by Wild Rose Studio
Black fine liner pen
acrylic block and stamping mat
sanding block ('fine' is best)
three matching colour inks I used More Mustard, Not Quite Navy and Ruby Red by Stampin'Up!
white large square card blank
baby wipes, one dry one for blending colours
something you can use as a mask for straight lines, I used an old TV magazine


Using a page from the TVmag I covered a bit more than half of my card front, picked up some red ink with my dried baby wipe and blended the red ink over the edge of the magazine page onto my base card making sure I was not going all the way along. Then I turned my card front around, covered again a bit more than half and blended some blue over the edge. that way I ended up with a white strip in the middle.
If you are using some wide masking tape, you need to position your tape where you want your white strip to be.
NOTE! If you haven't done this type of blending before, your crisp/straight edge will appear where your mask meets your card. It will be visible once you remove your mask. I also find it easier to use a dried baby wipe and pick up a little ink at the time for subtle blending. I would then dab my wipe slightly on the mask and using circular movements work the ink from my mask onto the card.

 
For the next step align the edges of your mask with the straight blue line covering the 'blue side' of your card and blend some mustard ink into your white strip taking care not to blend into the red area. Repeat on the red side.
 
 
For the next step open up your Ultimate Pro and place the front of your card coloured side down over the star making sure that it is centred. Using your embossing tool find your embossing line and emboss both the larger and the smaller star before rotating your card by 180 degrees (top to bottom) and embossing both stars again. This time make sure you only emboss the tips until you meet the outer of your already embossed stars.
Tip! You can find your line by lightly moving your embossing tool over the card. That way you can feel the gap of the embossing line underneath your card.
 
Next use your sanding block and lightly move it over the embossed stars. this roughens the outline and makes the stars more visible.
Stamp your chosen sentiment into the centre using mustard ink and finish off with some dashed lines or faux stitching, as shown in the card, using your fine liner pen.


Enjoy!!!
 
Tip! If you don't have the Ultimate Pro, try using some smaller embossing stencils placed randomly over your card front.


See you soon ... until then...
Happy Crafting!!!

Monika