Thursday, 22 January 2015

Shimmery Leaves

Hi Everybody,
thanks so much for all your lovely comments, they are very much appreciated.
Today I'm sharing with you a project I made a couple of days ago as my regular Spotlight Feature over at the STAMPlorations Blog. This time round I wanted to highlight how to heat emboss with stencils especially since my ARTplorations stencils, the new additions to the STAMPlorations Shop, had just arrived in the post the same day, and I had to have a play. I don't know about you,but I always love using my new 'toys'. :-)
Here is the card I made ...
This is a really quick and easy project to make, simply attach a piece of pink card to the reverse of the Leaf Prints stencil, sponge watermark pigment ink all over, remove stencil and heat emboss using clear embossing powder. Add some Perfect Pearls and heat set, emboss the sentiment (Sugar Rush, our current Stamp Club set, and Bold Sentiments: HELLO or Boxed Blooms) in white on a piece of vellum, layer up as seen and finish off by adding a few sequins.
I love the shimmer on the leaves when they catch the light, of course you could use any colour embossing powder for a more striking contrast.
Below are a couple of more photos capturing the subtle shimmer of the embossed leaves.

As always, there is a craft-along video tutorial giving you some extra hints and tips as I go along.

If you pop over to the STAMPlorations Blog and leave a comment there on my Spotlight Feature, you'll be entered into a prize draw. Also check back next week Monday for our week long Stamp Release Blog Hop.
I am entering this card into the following challenges:
CASology - Friend - I hope that the subtle pattern with the simple sentiment is still CAS enough
Less is More - Friends
4 Crafty Chicks - Best Friends
In The Pink - Pink & Pearlie, Ranger perfect pearls adds Mother of Pearl finish to embossing, hope this counts 
Uniko Studio - Love and Friendship, Gillian and Sarah from Sazzle Dazzle encouraged me to link up, hope it's ok given that I used the STAMPlorations watermark. if it is a problem please feel free to remove the entry. x
That's it from me for today. Hoping to be back tomorrow with some more inspiration for you ... until then ...
hugs
Monika x

materials used:
Regal Rose card stock by Stampin'Up!
Ranger Perfect Pearls
Watermark Pigment ink, white and clear embossing powder, vellum, sequins and stamps from the following sets:
preview-web-stencil-001-leaves-large.jpeg stmp1083.jpeg stmp1068.jpegor stmp1053.jpeg 

Wednesday, 21 January 2015

Valentine Love

Hi Everybody,
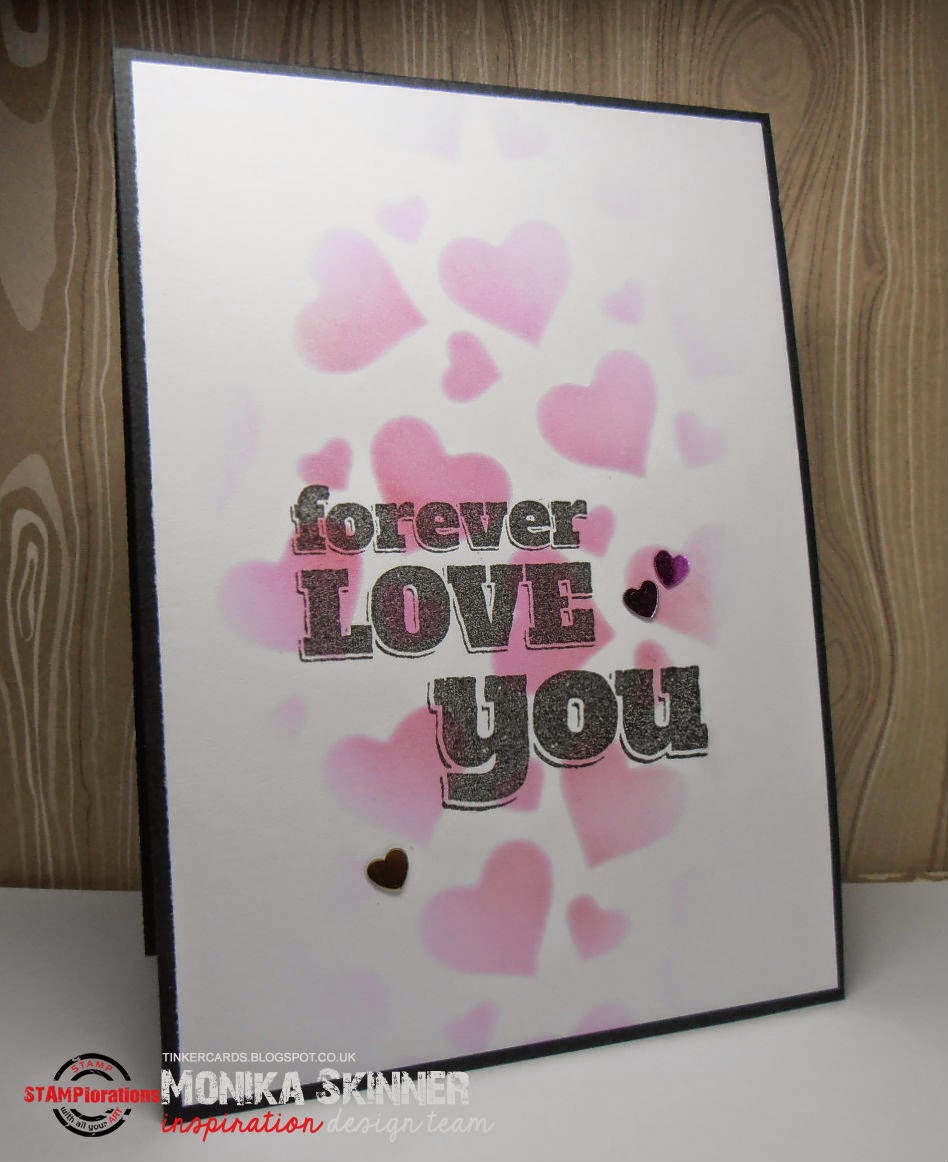
as promised I'm back again with another piece of inspiration for you. This must have been one of the quickest cards I ever made. I was just about to go to bed last night when I realized that I forgot to make my card for the special Time Out Challenge post over at STAMPlorations. I already had in mind that I would use the lovely new Hearts All Over stencil. I just love those tumbling hearts!
I quickly sponged some pink followed by red over the center. The red adds more depth to the pink and enhances the faded edge look I wanted to achieve. I then aligned and stamped my sentiments (Bold Sentiments: Cherish) before layering on my black base card and adding some confetti hearts for a sparkly finish.

The pink and black makes for a striking colour scheme, here is another more straight on view:
I am entering my card into the following challenges:
Time Out - Valentine's Day with optional twist of hearts
Addicted to Stamps and More - Holiday
Crafty Creations - something old, something new, stencil is new, sentiments & confetti hearts are old
Inspiration Destination - Anything Goes
Moo-Mania - Anything Goes

That's it for now, back later today with my STAMPlorations Spotlight Project and video tutorial. See you then. Have a lovely day!
hugs
Monika xxx

inks used: Melon Mambo and Real Red by Stampin'Up!, black Versacolour from stash
Stamps used:
stmp1067.jpeg preview-web-stencil-007-hearts.jpeg

Tuesday, 20 January 2015

Cute As A Button

Hi Everybody,
Thanks so much for your lovely comments. Sorry to hear that quite a few of you had difficulties joining my site, not sure what is happening there. Any suggestions are welcome!!!!
Today I got a grungy Baby Boy card I want to share with you. We went round the shops yesterday to have a look at baby clothes and what we could get as a present for Nick's nephew and his wife. The tiny jeans and checked shirts were so cute, I had to take my inspiration from them.
I was working with the Baby Greetings set by Woodware, the Grid stamp by Kaisercraft and the stars which came with a magazine from Practical Publishing, would have been either Papercraft Essentials or Simply Cards & Papercraft. A bit of stamping, colouring, fuzzy cutting and punching and the card was done.
Just heard, he has arrived and both mother and baby are fine!!!
It doesn't get any newer than this, hence I'm linking up at the 'What's New challenge over at Crafty Calendar and the Anything Goes Challenge at Cardz4Guyz.
That's it from me for today
Back soon with more inspiration. Have a lovely day!
hugs
Monika xxx

Monday, 19 January 2015

Sketch 26 at STAMPlorations

Hi Everybody,
As promised, I'm back today with another piece of inspiration for you. It is time for another sketch challenge at STAMPlorations. This is what I came up with:

My inspiration cam from a client who asked me if I already had any Mother's Day cards. This prompted me to dig a little deeper into my stamp supplies and bring out some golden oldies, apart frommit getting towards that time of year anyway. This card could be used any time of year, just to say thank you for being there.
I used Trendy Butterflies, Trendy Leaves, SB Thank You and MOM SAB #3 - Quiet Strength. To start with, I blended some inks (yellow, orange and pink) and stamped the SAB in orange to create my background, rotating it as I went along. It is a technique Shery has used a lot, and I thought I'd give it a go. ☺
I blended some more inks, cut my banner, upside down tag, and stamped my leaf and butterfly before liberally spritzing it all with golden ink. Once dry I over-stamped my butterfly with clear pigment ink and clear embossed it to give the color more strength before fuzzy cutting leaf and butterfly. I gold embossed my sentiment, layered my elements as shown and finished off by adding a few sequins, pearl and gems.
Here are another couple of pictures capturing the subtle golden shimmer.

Now back to the challenge. This is the sketch to take your inspiration from, and as always there is lots of scope.
Our Guest Designer Maria and my teamies created some stunning cards to showcase over at the STAMPlorations blog. The challenge will end 30th January and the winner will be announced 6th February. As always there are lots of prizes to be won including some guest designer spots. Pop over to the STAMPlorations blog for the full details and to enter your project.
Back soon with more inspiration. Have a lovely day!
Hugs
Monika xxx


Sunday, 18 January 2015

Never Been Used Schtuff

Hi Everybody,
Thanks for all the lovely comments you have been leaving. Hope you're all having a great weekend. It's supposed to be the coldest night of the winter in the UK so far. Mind you the temperature is falling steeply especially if you take the windchill factor into account. We've just come back from our Sunday walk. More often than not it takes us along the Boardwalk, a local footpath running along the shore of the Dee Estuary with stunning views over to North Wales. Lovely and blustery today ...
back home now with a good cup of coffee and wanting to show you this week's bounty.
For my first two cards I used a couple of sets which I had never used before. The rose is part of a set called Sweet pea by Kaisercraft, I bought it a few weeks ago at the craft shop in Burleydam Garden Center. I combined it with Hashtag Authentic, a new set by STAMPlorations due to be officially released week beginning Monday 26th January during a week long Blog Hop.
Card number 1 uses simple stamping combined with a spot of embossing. The word 'Beautiful' is stamped with red ink which I then over-stamped with clear pigment ink and clear embossed. A great way of adding colour to your embossing without needing different shades of embossing powder.
I am entering this card at
CASology - NBUS
Darnell's NBUS Challenge - Anything Goes
Card Number 2 has a slightly different layout and used copper embossing powder to highlight the sentiment plus some gently spritzed splashes/mist of gold and red (Artiste Spritzing inks by docrafts).
Card number 3 uses the same #Authentic set plus Celebrate Artsy, Holiday Artsy and the little heart from the new SB Love, another set from the official STAMPlorations release this January.
Card number 4 uses the same rose from Kaisercraft which I watercoloured using some ink from my Stamp'n'Write Markers (Stampin'Up!) and a sentiment from the Graphic Pentagons set by STAMPlorations. I am entering this card at
Addicted to Stamps and More - Make your Mark
Happy Little Stampers CAS Challenge - Watercolouring

That's it from me for today. I shall be back again tomorrow with another offering for you.
See you then.
hugs
Monika xxx

here are the sets I used:
stmp1090.jpeg stmp1091.jpeg stmp1060.jpeg stmp1024.jpeg stmp1040.jpeg
sorry, I couldn't find a photo of the sweet pea set by Kaisercraft

Sunday, 11 January 2015

Sunday Playtime

Hi Everybody,
Hope you all had a nice weekend. I certainly did, a couple of walks and some crafting time made for a perfect one. Even better I got some new stamps through the post this week, and what better time to try them out.
Here is my first one:
I have been using the Newlyweds set designed by my friend Shirley, The Bees Knees by STAMPlorations. My inspiration came from tye following challenges:
CASology - date - wedding day
Less is More - one layer and new beginnings - married life
Crafty Calendar - what's new - new set and new beginnings
One Layer Simplicity - attractive opposites - Mr & Mrs, graphic and splatters, doodled and straight
CAS(e) this Sketch - 
I first stamped and gold embossed my couple, then I drew my border, created a mask and masked off my couple and spritzed with Artiste Gold Spritzing ink (docrafts). Once dry, I removed my mask and stamped the Mr & Mrs sentiment. I love the gold spritzed background, it is subtle and effective. Hope you like it too.
My next card uses another set by Shirley, this time it's Houses
.I made this card for Nick's nephew and his girlfriend who moved into their first flat this week. These wobbly houses look somewhat cute and I couldn't help adding this great sentiment (Sizzix Eclips shape). I thought it really matched the occasion.
I would like to enter this card in the Allsorts 'New & Cute' and the Crafty Calendar 'What's New' challenges.
Better go off and do some cooking. :-)
Have a lovely week!
hugs
Monika xxx

formerly from Monika's Blog, I took the liberty of transferring my achievement badges

Edit:
Just found out that my Newlyweds Card got an Honourable Mention at CASology. Yay!!!! Thanks, Melissa, for picking my card.


 stmp1094.jpeg stmp1093.jpeg

Thursday, 8 January 2015

Accordion Flip

Hi Everybody,
Sounds almost like a cocktail, yet it is simply another helping of Sundae in the form of a accordion flip card. Here it is:
 I thought the sundae from the Sugar Rush STAMPlorations current STAMP CLUB set had the perfect shape to go with my cutting die (by Karen Burniston) which I used to cut the basic structure and layers. The 'Happy Birthday' sentiment is from the SKETCHED Simple Gift set.
Here are some more pictures from slightly different angles:


For a more in depth description on how I made the card, head over to the STAMPlorations Blog, where you can also find details about their current challenges.
As always, there is a craft-along video for you:

This is it from me for today. Back soon, in the meantime have a lovely weekend.
hugs
Monika xxx

stmp1083.jpegstmp1056.jpeg