Thursday 24 December 2015

Going on an Adventure Journey


Hi All. It's Monika with one last Spotlight Feature. As I am saying 'goodbye' from the STAMPlorations Spotlight Team (I shall be staying on in the Inspirations Team), I am also getting ready for an adventure of a lifetime cruising the canals of England. That's the plan. We had hoped to have a boat secured by now, but luck has been on someone else side. I shall keep you posted about our progress in next year's Inspiration Posts.

For now you can take inspiration from the cover I made for a little book meant to take the photos of our boat. Here it is:


I used some ready cut chipboard covers, lining paper -the stuff you put on walls is great if you want to go wet as it dries flat-, Mixed Media ElementsTrue NorthBold Sentiments Journey and Vignette Tree Silhouettes stamp sets plus Artplorations Stencil Some Birds.

For a full tutorial pop over to the STAMPlorations Blog. I just leave you with a close-up ...


That's it from me for today. Have a lovely Christmas and a wonderful 2016!

hugs
Monika xxx

Stamps and stencil used in today's project, links are in the above text:

SheryRuss_MixedMediaElements SheryRuss_TrueNorth-preview stmp1032.jpeg preview-STAMPlorations-Journey preview-web-stencil-037-somebirds

Tuesday 15 December 2015

Happy Holidays

Hi All,

Back again with more inspiration for you. Over at STAMPlorations it's the last one of this year's Inspiration Posts.

I wanted to take the opportunity to thank you all for your support and lovely comments this year, it really meant a lot to me especially during the last few months. I must also apologize for not visiting your blogs of late. It has been an enormously stressful time mentally and emotionally getting ready for some major changes I need to make. All will be revealed on Christmas Eve, but what I can say say for now is that cardmaking and blogging will still be part of it. I shall also be staying on STAMPlorations' Inspiration Design Team.

Now to today's project inspired by the Christmas decorations in and around Market Street in Hoylake where I live ...


I stamped and gold embossed the stars (Balloons and Banners), stamped and masked the houses (Houses), masked the moon and sponged my sky using Night of Navy and the shadows using Basic Grey inks. I then coloured my houses using Promarkers, first in bright colours before muting them by adding Cool Grey 3 on top with the exception of the windows. Next I used my Starlights Metallic Paints to stencil the tree (ARTplorations Christmas Trees Stencil), added a grey outline and gold glitter highlights before stamping my sentiment (Holiday Sketches: Christmas Flower) and layered on a matching base card to finish.

That's it from me for now. If you like CASEing and you find some time over the festive period, why not CASE one or more of our Inspiration Projects and link them up at the Playground. We, my Teamies and I, would love to see your creations.

Have a lovely Christmas!

hugs
Monika xxx

here is what I used, links are in the above text.
preview-DAIBalloonsandBanners stmp1094.jpeg stmp1072.jpeg preview-web-stencil-011-christmastrees.jpeg

Night of Navy and Basic Grey inks - Stampin'Up!
Artiste Gold Shimmer Pearlescent ink Pad - docrafts
Gold Satin Pearl WOW embossing powder
green and red Starlights Metallic Paints - Imagination Crafts
Promarkers

Monday 14 December 2015

Dreaming Big

Hi All!

It's Inspiration Time again over at the STAMPlorations Blog ... and I almost forgot to get my project done. Guessing indulging in Gluehwein at Liverpool's Christmas Market didn't help. LOL

Last night, when to my horror I finally remembered, I had to clear the desk and put an idea I had onto card. Here it is ...


I kept on seeing these loopy, bendy, springy things that were once quite fashionable gadgets and whose name elopes me, sitting in a semi circle on a desk ... I wondered how this could be translated into a card ... it had to be either different colours or generational stamping. A full semi circle was going to be too much so I decided to use a colour I could easily get a few generations of stamping with and simply create movement the eye could 'finish off'.

Out came the Hope Blooms set, post it note for masking, white base card, Concord Crush ink and off I went. Simply stamped, the card has still a lot of interest to keep the eye engaged, yet I wondered what it might look like with a few embellishments ...


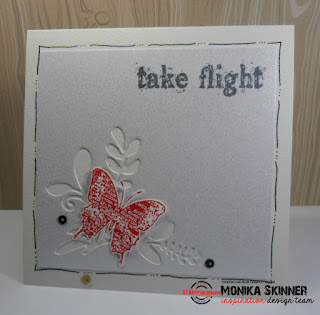
Next up is a card I made using up a few bits I found when rooting through my 'keep for another time box' ...


... the negative of a flourish cut from Centura pearl card and a red embossed butterfly from the VIGNETTE:Artful Flutters set. The sentiment is from Hope Blooms, otherwise it's been fuzzy cutting, layering and doodling plus a few sequins.

I am entering my first card at:
Less is More - one layer and 'What's in my stocking?' - Well this year I'm hoping, it's the fulfillment of a big dream, one Nick and I've had for over 14 years, ... too big to fit a stocking. The foundations have been laid, and it will happen next year. I am hoping to reveal all on Christmas Eve.
Allsorts - Golden Days, a big dream becoming reality
Addicted to CAS - Joy, dreaming big creates feelings of joy and joyful anticipation

That's it from me for now. Pop over to the STAMPlorations Blog for more inspiration, If you like CASEing one ore more of the inspiration projects, please link them up in the Playground, we love to see your makes.

Have a lovely day!

hugs
Monika xxx

here is what I used:
preview-SRD-HopeBlooms copy stmp1035.jpeg
Concord Crush ink - Stampin'Up!
flourish cutting die - Britannia Dies

Saturday 12 December 2015

December Stencil Hop Day 5


Hi All, welcome to Day 5 of the ARTplorations Stencil Blog Hop where we're celebrating all things stencil.

Here is my project ...


I was working with the Some Birds ARTplorations Stencil and added a handwritten sentiment with some doodles to create today's CAS card. I sponged my background using Daffodil Delight and Pumpkin Pie inks on a pieced rectangle die cut. I then added the bird in Early Espresso and my sentiment plus doodles using the same colour maker pen. To finish, I layered my bird on a linen effect base card and added a few sequins.

For oodles of inspiration check out what the rest of the team made! You'll find links to all our projects here.

As with any blog hop simply leaving a comment on participating blogs can win you a prize, you can find all the links here. Commenting closes on Sunday 13th December and the winner will be announced on Tuesday 15th December.

Hold on, that's not all ... there is also a Stencil Linky Party running alongside the hop increasing your chances of winning a prize. It's all explained in the details below ...

*****

Prizes:

FIVE (5) winners will receive their choice of ARTplorations stencil (standard size - 5x7). Winners will be randomly drawn from all comments left on the designers' blogs.
ONE (1) winner will receive a $15 gift certificate OR her choice of 2 ARTplorations stencils (standard size - 5x7). Winners will be randomly drawn from comments left on the STAMPlorations blog.

Extra prizes for those who participate in the Flash Stencil Project Linky Party and link up by December 13:

TWO (2) winners whose projects feature stencils (any brand) will each receive their choice of one (1) ARTplorations stencil (standard size - 5x7)
ONE (1) winner whose project features an ARTplorations stencil will receive her choice of three (3) ARTplorations stencils (standard size - 5x7) OR a $15 gift certificate to the shop.

*****

links to previous days:

Day 1 - Day 2 - Day 3 - Day 4

That's it from me for today. Have a lovely day and enjoy hopping.

Good Luck!

Monika xxx


here is what I used in today's project, links are in the above text:


Daffodil Delight, Pumpkin Pie and Early Espresso inks and marker - Stampin'Up!

Friday 11 December 2015

December Stencil Hop Day 4


Hi All, welcome to Day 4 of the ARTplorations Stencil Blog Hop where we're celebrating all things stencil.

Here is my project ...


Today I worked with the Holly Backgrounds ARTplorations Stencil. As you can see I used my green and red Starlights Metallic Paints again to sponge the leaves and berries on a piece of linen textured card which I lightly edged with my gold leaf pen before layering on my red base card. To finish I simply added a shadow layered red/gold die-cut sentiment.

For oodles of inspiration check out what the rest of the team made! You'll find links to all our projects here.

As with any blog hop simply leaving a comment on participating blogs can win you a prize, you can find all the links here. Commenting closes on Sunday 13th December and the winner will be announced on Tuesday 15th December.

Hold on, that's not all ... there is also a Stencil Linky Party running alongside the hop increasing your chances of winning a prize. It's all explained in the details below ...

*****

Prizes:

FIVE (5) winners will receive their choice of ARTplorations stencil (standard size - 5x7). Winners will be randomly drawn from all comments left on the designers' blogs.
ONE (1) winner will receive a $15 gift certificate OR her choice of 2 ARTplorations stencils (standard size - 5x7). Winners will be randomly drawn from comments left on the STAMPlorations blog.

Extra prizes for those who participate in the Flash Stencil Project Linky Party and link up by December 13:

TWO (2) winners whose projects feature stencils (any brand) will each receive their choice of one (1) ARTplorations stencil (standard size - 5x7)
ONE (1) winner whose project features an ARTplorations stencil will receive her choice of three (3) ARTplorations stencils (standard size - 5x7) OR a $15 gift certificate to the shop.

*****

links to previous days:
Day 1 - Day 2 - Day 3

That's it from me for today, back again tomorrow with more stencil inspirations.

Have a lovely day and enjoy hopping.

Good Luck!

Monika xxx

here is what I used in today's project, links are in the above text:
preview-web-stencil-012-holly-background.jpeg

Green and Red Starlights Metallic Paints - Imagination Crafts
sentiment die - Clearly Besotted

Stenciled CAS

Hi Everyone,

sorry this post published 1 hour too early, when I hadn't prepared it. Apologies if you stopped by to check it out and only saw the card on its own.

I was playing with stencils when creating projects for the ARTplorations Stencil Blog Hop which is still in full swing, you can find the details here.

One of the cards I created was this one ...


As you well know when using stencils, even with the so called background ones, you can pick out small elements to make pretty CAS cards. This is what I did with my card. I used just one bit of the Holly Backgrounds stencil sponged with Starlights Metallic Paints on a pierced rectangle die cut to which I added a sepia stamped sentiment from the Holiday Artsy set.

The paints I used have such a beautiful sparkle that I felt it didn't need any further embellishing. I made another card using the same stencil, this time in its entirety, and combined it with a die cut sentiment. You can see the finished card in my post here.

Pop over to the STAMPlorations Blog for more inspiration. There is plenty of eye candy for you to get your creative mojo going. We invite you to CASE (take inspiration from) any of our projects. If you do so, please link them up in the Playground. It is always such fun to see how you were inspired by one of our makes. Anyone who does link up will have a chance to win a fab prize.

That's it from me for now, back again in an hour's time with my latest offering for the ARTplorations Stencil Blog Hop.

Until Then ...

hugs
Monika xxx

here is what I used, links are in the above text:
 stmp1024.jpeg

Thursday 10 December 2015

December Stencil Hop Day 3


Hi All, welcome to Day 3 of the ARTplorations Stencil Blog Hop where we're celebrating all things stencil.

Here is my project ...


Something a little more CAS today using the Old Rose Prints ARTplorations Stencil with a sentiment from the Vignette Tree Silhouettes STAMPlorations stamp set.

I used a pierced rectangle die cut and sponged it using Crisp Cantaloupe ink to create my base colour before adding the roses with Calypso Coral. I stamped my sentiment, die cut a golden flourish, layered everything as seen and finished off by adding a few sequins.

For oodles of inspiration check out what the rest of the team made! You'll find links to all our projects here.

As with any blog hop simply leaving a comment on participating blogs can win you a prize, you can find all the links here. Commenting closes on Sunday 13th December and the winner will be announced on Tuesday 15th December.

Hold on, that's not all ... there is also a Stencil Linky Party running alongside the hop increasing your chances of winning a prize. It's all explained in the details below ...

*****

Prizes:

FIVE (5) winners will receive their choice of ARTplorations stencil (standard size - 5x7). Winners will be randomly drawn from all comments left on the designers' blogs.
ONE (1) winner will receive a $15 gift certificate OR her choice of 2 ARTplorations stencils (standard size - 5x7). Winners will be randomly drawn from comments left on the STAMPlorations blog.

Extra prizes for those who participate in the Flash Stencil Project Linky Party and link up by December 13:

TWO (2) winners whose projects feature stencils (any brand) will each receive their choice of one (1) ARTplorations stencil (standard size - 5x7)
ONE (1) winner whose project features an ARTplorations stencil will receive her choice of three (3) ARTplorations stencils (standard size - 5x7) OR a $15 gift certificate to the shop.

*****

links to previous days:

Day 1 - Day 2

That's it from me for today, back again tomorrow with more stencil inspirations.

Have a lovely day and enjoy hopping.

Good Luck!

Monika xxx

here is what I used in today's project, links are in the above text:


flourish - Britannia dies
Crisp Cantaloupe and Calypso Coral inks - Stampin'Up!

Wednesday 9 December 2015

December Stencil Hop Day 2


Hi All, welcome to Day 2 of the ARTplorations Stencil Blog Hop where we're celebrating all things stencil.

Here is my project ...


I've gone from CAS to Mixed Media and used the Christmas Trees ARTplorations Stencil in combination with the Mixed Media Elements, Joyful, Vignette Christmas Block and Holiday Sketches Christmas Candles STAMPlorations stamp sets.

I started off by applying some River Rock ink to my splodge mat, spritzing it with water and lifting a print off using linen textured card and slightly blended the edges using the left over ink from the mat. Once dry I stamped the script and snowflakes using the same colour ink. Next I stenciled the Christmas Tree using green and red Starlights Metallic Paints before creating my sentiment (Joyful and Christmas Candles) and stamping it in Sepia Archival Ink. To finish, I edged my topper with a gold leaf pen and layered on my red base card.

For oodles of inspiration check out what the rest of the team made! You'll find links to all our projects here.

As with any blog hop simply leaving a comment on participating blogs can win you a prize, you can find all the links here. Commenting closes on Sunday 13th December and the winner will be announced on Tuesday 15th December.

Hold on, that's not all ... there is also a Stencil Linky Party running alongside the hop increasing your chances of winning a prize. It's all explained in the details below ...

*****

Prizes:

FIVE (5) winners will receive their choice of ARTplorations stencil (standard size - 5x7). Winners will be randomly drawn from all comments left on the designers' blogs.
ONE (1) winner will receive a $15 gift certificate OR her choice of 2 ARTplorations stencils (standard size - 5x7). Winners will be randomly drawn from comments left on the STAMPlorations blog.

Extra prizes for those who participate in the Flash Stencil Project Linky Party and link up by December 13:

TWO (2) winners whose projects feature stencils (any brand) will each receive their choice of one (1) ARTplorations stencil (standard size - 5x7)
ONE (1) winner whose project features an ARTplorations stencil will receive her choice of three (3) ARTplorations stencils (standard size - 5x7) OR a $15 gift certificate to the shop.

*****

links to previous days:
Day 1

That's it from me for today, back again tomorrow with more stencil inspirations.

Have a lovely day and enjoy hopping.

Good Luck!

Monika xxx

here is what I used in today's project, links are in the above text:
preview-web-stencil-011-christmastrees.jpeg
SheryRuss_MixedMediaElements stmp1075.jpeg stmp1073.jpeg stmp1071.jpeg
Red (133) and Green (135) Starlights Metallic Paints - Imagination Crafts
River Rock ink - Stampin'Up!


Tuesday 8 December 2015

December Stencil Hop Day 1


Hi All, welcome to Day 1 of the ARTplorations Stencil Blog Hop where we're celebrating all things stencil.

Here is my project ...


I was working with the Some Birds ARTplorations Stencil and a sentiment from True North to create this CAS card. I sponged my background using Tempting Turquoise, Concord Crush inks and a small punched circle as mask on a pieced rectangle die cut. I then added the birds and my sentiment in the darker Concord Crush and layered on my linen effect base card.

For oodles of inspiration check out what the rest of the team made! You'll find links to all our projects here.

As with any blog hop simply leaving a comment on participating blogs can win you a prize, you can find all the links here. Commenting closes on Sunday 13th December and the winner will be announced on Tuesday 15th December.

Hold on, that's not all ... there is also a Stencil Linky Party running alongside the hop increasing your chances of winning a prize. It's all explained in the details below ...

*****
Prizes:

FIVE (5) winners will receive their choice of ARTplorations stencil (standard size - 5x7). Winners will be randomly drawn from all comments left on the designers' blogs.
ONE (1) winner will receive a $15 gift certificate OR her choice of 2 ARTplorations stencils (standard size - 5x7). Winners will be randomly drawn from comments left on the STAMPlorations blog.

Extra prizes for those who participate in the Flash Stencil Project Linky Party and link up by December 13:

TWO (2) winners whose projects feature stencils (any brand) will each receive their choice of one (1) ARTplorations stencil (standard size - 5x7)
ONE (1) winner whose project features an ARTplorations stencil will receive her choice of three (3) ARTplorations stencils (standard size - 5x7) OR a $15 gift certificate to the shop. 

*****

That's it from me for today, back again tomorrow with more stencil inspirations.
Have a lovely day and enjoy hopping.


Good Luck!
Monika xxx


here is what I used in today's project, links are in the above text:
preview-web-stencil-037-somebirds SheryRuss_TrueNorth-preview
pierced rectangle sax dies - dienamics
Tempting Turquoise and Concord Crush inks - Stampin'Up!

Thursday 3 December 2015

Gremlins Galore

Hi All,

Been entertaining Gremlins again!!! Yesterday that was, when I was trying to get my Spotlight Project done for STAMPlorations. They must find me being quite a good host, providing them with lots of entertainment ....

Lets show you the finished project first ...


It's not a card, but a little vellum envelope/treat bag/gift wrapping/gift card holder .... I am sure that you'll be able to find plenty of uses.

It was in the process of making this that my little guests got plenty to enjoy themselves on. It started with spritzing the vellum and trying to prevent it from curling up. The idea was that I would pick the spritzed vellum up and nicely place it on a radiator to dry ... bad idea .... as soon as I picked said vellum up ... as by magic ... it rolled itself up tightly ...not exactly what one would like to happen given that it was still wet with ink. Lesson learned: I let my second piece dry in situ.

Punching the vellum to create the little bag was a little tricky, but easy enough. Phew!!!

Next up stamping the poinsettia ... in sepia archival ink on vellum and colouring from the reverse with alcohol markers ... nice idea .... that's if the Gremlins hadn't ad other ideas ... Having never really coloured vellum in such a way, I was rather relying on their co-operation ... What I got was mischief!!! First of all the archival ink too seemed to develop a mind of its own and started blurring and running in some odd way. It's never happened to me before, the stamping on the bag looks pretty crisp. I won't even mention my disaster of reverse colouring, I'm too embarrassed to share it hence I went for embossing and picked up my Apple Red Ultra Fine WOW powder ... or so I thought. What I had picked up instead was a pot of granules looking more at home in a kitchen cupboard than in my craft room .... OOOPS! Did I mention??? I hadn't read the label when purchasing the magazine the powder came with a while ago ... I simply assumed.

Well, as it turns out this WOW Ultra High embossing powder makes your image look as if it was drizzled using thick luscious caramel or chocolate. Not so bad after all.

If you would like to see how my project was made in the end pop over to the STAMPlorations Blog for a photo and video tutorial.

Have a lovely day!

hugs
Monika xxx

stamps I used:
VIGNETTE: Christmas Block, Holiday Sketches: Christmas Flower, Sentiment Builders: Christmas & New Year
stmp1073.jpeg stmp1072.jpeg stmp1074.jpeg
tools used:
Flower Pinch Board - We R Memory Keepers
there is also a little video showing you how to make a similar bag:


Tuesday 1 December 2015

December CASEplorations


Hi All,
It's time for another month of CASEplorations over at STAMPlorations where CASEing means 'taking inspiration from'.
As it is December and here in the northern hemisphere that means anything from freezing to cool and damp, what better way to warm up than looking at having a hot drink ... hence this month's inspiration comes from the following card by Amy Tsuruta:


It has a brilliantly frosty colour scheme combined with the warmth of a hot cuppa. You can find Amy's original post here.

Well, winters where I live hardly ever are crisp and frosty, and Shirley had already used the Gluehwein punchline (bang went the Christmas Market idea :-/) ... I had to think on my feet and came up with this watery, rainy look ...


I liked the colour combo of the grey and cool blue and decided to use my splodge mat for creating the background. Ink and water react differently and you get a drier print than with a normal brown craft mat. I applied some Soft Sky ink to my splodge mat and spritzed with water before lapping it up with a piece of linen effect card. I used the left over ink from my mat to slightly blend the edges.
I stamped the mug, hearts (both from Sketchy Coffee Cups) and stitching (Graphic Squares) using Basic Grey ink and added my sentiment using Lost Lagoon. Initially I thought that I would add some shading to the cup and hearts, but decided against it. I rather liked the pastel look.

Pop over to the STAMPlorations Blog for more CASE Inspiration and to link up your CASEd creation(s).

Have a lovely day!

hugs
Monika xxx

here is what I used, links to the stamps are in the above text:
SRD-SketchyCoffeeCups-preview stmp1041.jpeg

Soft Sky, Lost Lagoon and Basic Grey inks - Stampin'Up!