Tuesday 31 March 2015

Lovely Moments

Hi Everybody,

back with a second post today. Looks as if there is no stopping me ... LOL
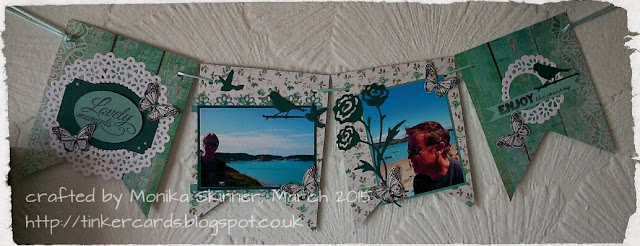
Well I finally got my banner finished. I started it last Saturday at a KaierCraft Demo in my local Craft Shop at Burleydam Garden Center. The lovely Elisabeth Robinson was demoing ... and I was able to meet up with Julie from Crafted by Jules. We had a good natter and a fab lunch too!


The photos are from our last ever holiday in our caravan, not that we knew it at the time ... a few weeks later we got an offer we couldn't refuse and sold it.

Enjoy and have a lovely day!
hugs
Monika xxx

Label dies - Inspired by Stamping
bird dies, butterfly stamp, lace border die, Lovely Moments sentiment and paper - KaiserCraft
rose die - Wild Rose Studio
doily die cuts - were given to us at demo
Enjoy The Journey sentiment - STAMPlorations

Happy Thoughts

Hi Everybody,
Today I got three projects I want to share with you, all of which form part of the Inspiration Round Up Post over at the STAMPlorations Blog. As you've probably noticed for one reason or another I didn't have much time this month to craft. Yesterday was the first day I could really sit down and indulge myself ...
With Spring having officially started, I thought the SKETCHED: Tulips would be the perfect stamp to work with. As always I had a vague idea of what I wanted to do which was that I wanted my tulips to be yellow with a hint of orange ... off I went to colour some using Promarkers and watercolour pencils.
Here is my first card using the fuzzy cut Promarker coloured image ...


Initially I thought I'd add some splashes or dotty patterned paper to my background, but after trying out various options, I decided that I wanted to keep this card crisp and clean ... and the dotty paper morphed into a dotty embossed piece of white card and a strip of dotty ribbon. Once layered, I simply added a framed sentiment from the Blossom Overture stamp set, our current STAMP CLUB set, a punched butterfly and gems to finish.
My watercoloured Tulip image is next and I went all out grungy for a floral birthday card ...


The style of this one and my third card was inspired by the sprayed backgrounds I made a while ago when trying out my Artiste Spirtzing Inks (docrafts) on lining paper. Lining paper is great as it drys flat after being wet. With it being cream which mutes the colours somewhat, it is also ideal to create a grunge or vintage look for your card. This card simply developed as I went along. First I stamped the Chevrons and Arrows in apricot pigment ink (ColorBox), next I spritzed some brown and peach splashes, then I added the stitching (PATCHWORK FRENZY: Graphic Squares) to two of the corners and stamped the rings and circles using the ring stamp and its reverse from the Newlyweds Extras set (The Bees Knees by STAMPlorations). It is great for almost bubble like stamping. I layered it all up, added my white embossed sentiment (VIGNETTE: Chevron & Arrows) and finished off by adding a few green metal embellies.
Next up is another Grunge Card ...


I started off by stenciling the word HUGS from the ARTplorations Stencils: Hello & Company in red over my sprayed background. To add dimension I first drew the outline of the word in a darker red and added some partial white outline using my chalk marker. I then added some more stenciling using the ARTplorations Stencils: Hearts All Over around the outside allowing it to fade towards the center. I then added some splashes and rings from the Holiday Artsy set before rounding three corners, layering on my light cream base card, attaching my sentiment banner (VIGNETTE: Chevron & Arrows) and finishing off with a tiny punched heart. I did contemplate adding some bling, but decided against it given that the spritzing ink is already pearlescent and that it would make a good masculine birthday card as it stands.

Hope you enjoyed my little offering today.
Back soon with more inspiration ...
Have a lovely day!

Hugs
Monika xxx


What I used from STAMPlorations:
 stmp1024.jpeg stmp1031.jpeg stmp1092.jpeg stmp1041.jpeg preview-web-stencil-007-hearts.jpeg preview-web-stencil-010-bigwords.jpeg

from Stampin'Up!
early espresso, bravo burgundy, riding hood red, pumpkin pie, rich razzleberry inks; chalk marker; early espresso and rich razzleberry card; owl builder (tiny heart) and small butterfly punches

ribbon - Fantastic Ribbons

gems and other card from stash

Tuesday 10 March 2015

ARTplorations Stencils Blog Hop Day 3


Hi All! Welcome to Day 3 of the ARTplorations Stencil Blog Hop where we, the STAMPlorations Girls, put stencils through their paces.
Today is less bright and daring, and I worked with the ARTplorations Stencils Oh My Stars! and Bubbles.


For my first card I dry embossed the Oh My Stars! stencil using my Big Shot and a rubber embossing sheet, which you simply place on your stencil before adding the required plates (check your machine instructions as these vary depending on make) and putting it through your machine.I left the stencil in place and sponged More Mustard ink to highlight the stars even further. I then removed the stencil and did some more sponging before adding a die-cut frame (Tattered Lace), swirl, sunflower and sentiment (both from the Bloom Sketches set) and finishing off by adding a butterfly (Trendy Butterflies) and pearl.


For my next card I created a background using inks and crafting mat. First I swiped some Tempting Turquoise ink over my crafting mat, spritzed it with water and took a print by placing a piece of card on the inked & spritzed area and smoothing over it using my hands. After it had dried I repeated the process using Island Indigo ink. Depending on how wet you make the ink on the mat, you end up with a more or less splattered look. Mine wasn't very wet, this allowed for the swipe marks to add a different type of texture and interest. Once dry I rounded three corners, attached my Bubbles stencil and sponged some more Island Indigo all over keeping it darker towards the edges. Next I white embossed my sentiment from the Boxed Blooms set and added a die-cut border (Tattered Lace) before finishing off by adding some tiny stars and butterfly (Trendy Butterflies) with pearl.

SIX winners, that's two per day randomly drawn from all the comments left on our blogs, will receive their choice of ARTploration Stencil.

THREE winners, randomly drawn from comments left on the STAMPlorations Blog Blog Hop Posts, will receive a $15 gift certificate from the STAMPlorations Store.

plus surprise prizes

Commenting finishes 13th March and the winners will be announced 15th March. Good Luck!

Make sure you leave a comment when visiting our blogs, you can find all the links here.

Have fun hopping!
hugs
Monika xxx

Here is what I used:
preview-web-stencil-009-stars.jpeg preview-web-stencil-008-bubbles.jpeg stmp1061.jpeg stmp1053.jpeg stmp1082.jpeg

Tattered Lace dies by Stephanie Weightman
all inks mentioned from Stampin'Up!

Monday 9 March 2015

ARTplorations Stencils Blog Hop Day 2


Hi All! Welcome to Day 2 of the ARTplorations Stencil Blog Hop, where we, The STAMPlorations Girls, are putting stencils through their paces.
Again I have been going a little bold and crazy today using some of the Gelli Plate backgrounds I made using ARTplorations Stencils Leaf Prints.


I worked with two of the prints I took from one application of acrylics. I first started by laying down some ultramarine, put my stencil on top and applied some metallic silver through my stencil. I then lifted my stencil off and took the first print, which forms the background in my first card. The second print is the one I altered adding some Metallic Melon Gelattos and Spiced Marmalade Distress Paint. I cut both pieces to size and added a strip of plasterboard tape, some sponged die cut flowers, a butterfly and sentiment both from the Trendy Butterflies set to my first card. I decided to white emboss my sentiment on a strip of off-cut to help it blend in better. After layering it all as seen on my pink base card I simply added some silver pearls and a touch of glitter to finish.


For my second card I black embossed my sentiment from the Boxed Blooms set, layered on my black base card and added some pearls and candy dots to finish.

Please leave a comment, and you'll be entered in our prize draw, the details of which are:

SIX winners, that's two per day randomly drawn from all the comments left on our blogs, will receive their choice of ARTploration Stencil.

THREE winners, randomly drawn from comments left on the STAMPlorations Blog Blog Hop Posts, will receive a $15 gift certificate from the STAMPlorations Store.

plus surprise prizes

Make sure you leave a comment when visiting our blogs, you can find all the links here.

That's it from me for today, back tomorrow with more stencil inspiration for Day 3 of the ARTplorations Stencil Blog Hop.

Have fun hopping!

hugs
Monika xxx


preview-web-stencil-001-leaves-large.jpeg stmp1053.jpeg stmp1082.jpeg

More Gelli Plate

Hi Everybody,
Thanks so much for all your lovely comments. They are very much appreciated. As you might have noticed there is a Blog Hop going on over at the STAMPlorations Blog. This time around it's all about stencils, and the STAMPlorations girls got bags of ideas, tips, tricks and techniques to share. You can find the projects from Day 1 here.

Now to today's project I want to share. I used one of the Gelli Plate backgrounds I created the other day using the ARTplorations Stencil Shutters in combination with the Blossom Overture and Hashtag Authentic stamp sets. Here it is:


First I put down a layer of metallic silver acrylic paint on my Gelli Plate on which I put my stencil. Then I spread a little mustard acrylic paint over part of the stencil before removing the stencil and taking my first print, which is the one I used for this card. I still need to record a video on how exactly I make my prints, for now Shery has a quick demonstration here which is similar to what I do.
I stamped, coloured (Promarkers: gold, tulip yellow, honeycomb, burnt orange, pear green) and fuzzy cut my rose from the Blossom Overture set, heat embossed the sentiment amazing and stamped the you are in green. I then layered my elements on a green base card and attached some twine and metal charm to finish.

This card is part of the Inspiration Post over at the STAMPlorations Blog. This is where we invite you to pick one of our creations, CASE and enter it at the CASEplorations Playground for your chance to win $15 gift certificate or two ARTploration stencils of your choice. You can find all the information here.

I would like to enter my card at:

Crafty Calendar - add metal
Sisters of Craft - anything goes
Scribble and Scrap - anything goes
Crafts Galore Encore - anything goes
613 Avenue Create - Anything Goes

Next up is a quick feel better card, one can never have too many of these ...


I simply stamped and heat embossed the chevrons, stamped my sentiment, stamped, coloured, fuzzy cut and attached my rose, doodled a border and added some gems and glossy accents to finish.

I am entering this card at:
Addicted to Stamps and More - CAS
Stempelsonne - anything goes with stamp as main focus

Hope you enjoyed my little offering today. If you did and you would like to follow my blog, you can either follow through Google+ or by clicking on the small green squares next to the join this site button.
I shall be back shortly with my projects for Day 2 of the ARTplorations Stencil Blog Hop.
See you there.
Have a lovely day!
hugs
Monika xxx

here is what I used:
from STAMPlorations
StampClub-BlossomOverture-preview.jpeg stmp1090.jpeg preview-web-stencil-006-shutters.jpeg stmp1031.jpeg
Gumball Green ink and card, Wild Wasabi ink, Early Espresso ink and embossing powder, Riding Hood Red Stamp'n'Write Marker and glossy accents/ crystal effects - all from Stampin'Up!
Twine from Fantastic Ribbons
metallic silver acrylic paint from Poundland
mustard acrylic paint from HomeBargain
gold embossing powder, gems, charm from stash

Sunday 8 March 2015

ARTplorations Stencils Blog Hop Day 1


Hi All! Welcome to the ARTplorations Stencil Blog Hop!!!
This is where we, the STAMPloration Girls, put our ARTplorations Stencils through their paces. If you follow our Spotlight Features, you might have noticed that we have been using them a lot giving you in depth tutorials, and now we are back with loads more!!!

Today is Day 1, and I have gone a little bold and crazy as I got carried away experimenting ...


Well I do like using my alcohol markers over inked backgrounds for a floating and transparent look. You may remember I did play with this technique a while ago here and here for example. Any way I gave it a go using the ARTplorations Bold Florals Stencil and Tinge Alcohol Markers Sky Blue and Brilliant Blue. The background was one I made the other day when playing with my inks, you can find the explanation here plus some more stencil ideas ... but now back to today's HOP PROJECTS.
I simply used the Bold Florals stencil for the outline and then coloured with my markers, added a clear embossed sentiment from the Bloom Sketches set for the unexpected hidden message, layered on a pink base card and added some clear glitter to the center of my flower.


For my next card I used one of the backgrounds I created when I was playing with my Gelli Plate and some of my homemade scented embossing paste, you can find the tutorial for the paste and how I masked here, The background was created when I rolled the leftover paint off my roller. I did however smudge a little when I applied my paste hence I simply added a little stalk, brushstroke from the Celebrate Artsy set, which makes my smudges look like little leaves. :-) I added my sentiment from the Celebrate Artsy set, layered on my black base card and finished off by adding some champagne glass glitter to the center of my flower.


That's it from me for today, I shall be back again tomorrow with more stencil inspiration for Day 2 of our Blog Hop. Please leave a comment, and you'll be entered in our prize draw, the details of which are:

SIX winners, that's two per day randomly drawn from all the comments left on our blogs, will receive their choice of ARTploration Stencil.

THREE winners, randomly drawn from comments left on the STAMPlorations Blog Blog Hop Posts, will receive a $15 gift certificate from the STAMPlorations Store.

plus surprise prizes

Make sure you leave a comment when visiting our blogs, you can find all the links here.

Have fun hopping!
hugs
Monika xxx


here is what I used:

preview-web-stencil-002-bold-florals.jpeg stmp1061.jpeg stmp1060.jpeg

Tinge Alcohol Markers - The Works
Strawberry Slush card, Champagne Glass Glitter, Poppy Parade ink and ink refill, Melon Mambo, Tempting Turquoise and Island Indigo ink from Stampin'Up!

Thursday 5 March 2015

Mega Flake Magic


Hello Everyone,
Today's post is part of the Spotlight Feature over at the STAMPlorations Blog. I decide to use some of their ARTplorations Stencils, Bold Florals and Oh My Stars! plus sentiment from Bloom Sketches, in combination with Flitter Glu and Mega Flake to create these cards with a stunning metal effect.


For your step by step instruction on how I made these cards, pop over to the STAMPlorations Blog and leave a comment for your chance to win.
The little video below explains how I created my backgrounds and demonstrates how to use Flitter Glu and Mega Flake with stencils.


That's it from me for today. I shall be back soon with more inspiration by the latest on Sunday for the ARTplorations Stencils Blog Hop over at STAMPlorations.

See you there. Have a lovely day!
hugs
Monika xxx


preview-web-stencil-002-bold-florals.jpeg preview-web-stencil-009-stars.jpeg stmp1061.jpeg
Flitter Glu and Mega Flake available from Indigo Blue

Sunday 1 March 2015

CASEploration March


Hi Everybody,
It is time again for a new CASEploration project. This month we took inspiration from a card made by Loll.

One could take inspiration from the lattice background, the golden and red colours, the candles or the Christmas theme. If you want to check it out in more detail, you can find Loll's original card here on her blog.
Here is my take on this month's project:
As you can see, I went with the Christmas theme, the colours and the candles. My background panel is a piece from the Gelli Plate treasures I created the other day, when I was working with the ARTplorations Stencils: Bubbles and rolled the paint left on my roller off on a piece of card which I subsequently used to get an imprint of the stencil itself. I felt that my artistic smudges were a good interpretation of the lattice, and the coppery colour, a mix of red and golden acrylics, adds a lovely shimmer, which sadly doesn't come through in the photograph. I heat embossed my sentiment in gold  to match the golden die cut and stamped coloured and fuzzy cut the candles, all from the  Holiday Sketches: Christmas Candles set, bfore layering my panel on gold pearlized card, adding my candles and layering it all on my red base card. I decided to go for a bold base card to add some contrast similar to Loll's card. My panel is much lighter than hers and a white base card would have been rather pale and washed out looking. I also decided to match the red of my base card to the red in my panel, I rather like how it adds depth and makes the candles stand out.

To see how my teamies interpreted Loll's card pop over to the STAMPlorations Blog, this is also where you can find a link to the Playground and join us in CASEing.
Hope you'll join us, have fun!
Hugs
Monika xxx

Here is what I used:
 preview-web-stencil-008-bubbles.jpeg
Red and gold metallic acrylic paint from Poundland
Riding Hood Red card from Stampin'Up!
Promarkers and Tinge Alcohol Markers for colouring